Add an image
First of all - Open the product → images & other files. Here you can see the images that are currently attached to the product. To add images press add files → Browse or drag and drop the image from the dashboard to the box. When the picture gets a green top, the upload is complete → Add X files. Now the picture is uploaded

Primary image and reorder
The primary image is the image in the upper left corner beside the item name. The primary image is the image that will be shown in the webshop as the first picture.
To get another primary image press Reorder files and simply grab the picture that you want to be the primary picture and drag it all the way to the left and now it gets the primary image tag. The order of the picture is left to right so it is possible to rearrange the pictures by dragging them to the order that you want.
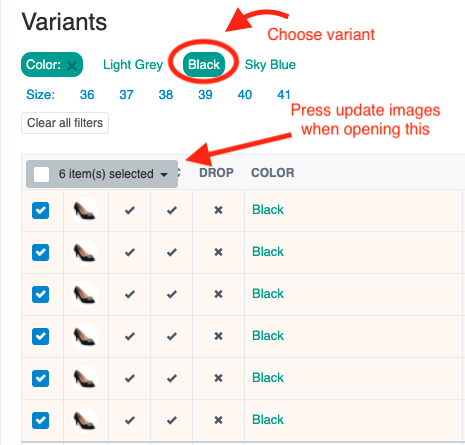
If you have multiple colors you would want to tell TRAEDE which picture belongs to each color. In this case, you have a black variant. Go to details → Variants and simply press the empty image on the left and select the pictures you want to add to this variant. This will only add the images to the exact variant that u pressed. To select a picture for a whole color press Color → Black - This will mark every variant that you have of that color. Now press X item(s) selected → Update images and now select the images you want to represent the black color.
OBS: TRAEDE will consider the first image you click the primary image.

Format
Format: Images have to be 1.3 times higher than wide. TRAEDE supports most image formats, so there is no rule for this. TRAEDE will convert it.